The Debutante Camellia, also commonly known as “Sara C. Hastie” or simply “Debutante,” is a stunning Camellia japonica cultivar, celebrated for its light pink, peony-form blooms. This evergreen shrub adds a touch of elegance and early-season color to gardens, making it a favorite among both novice and experienced gardeners.
This comprehensive guide will delve into every aspect of the Debutante Camellia, from its origins and characteristics to detailed planting, care, and propagation instructions. We’ll explore its ideal growing conditions, common challenges, and how to overcome them. Continue reading to discover the solutions, to unlock the secrets to successfully cultivating this beautiful Camellia variety and find answers to questions like where to buy Camellia Debutante and understand Camellia Debutante price points.
Understanding the Debutante Camellia: A Deep Dive
The Debutante Camellia boasts a rich history and a unique set of characteristics that make it a standout choice. It’s not just a pretty flower; it’s a plant with a story and specific needs. This section will provide a deep dive into the botanical aspects, origin, and distinguishing features of this beloved camellia.
The Debutante Camellia was introduced in the early 20th century. It’s believed to have originated in the United States, quickly gaining popularity due to its exquisite blooms and relatively easy care requirements compared to some other camellia varieties. Some sources claim it a product of Magnolia Gardens near Charleston, South Carolina.
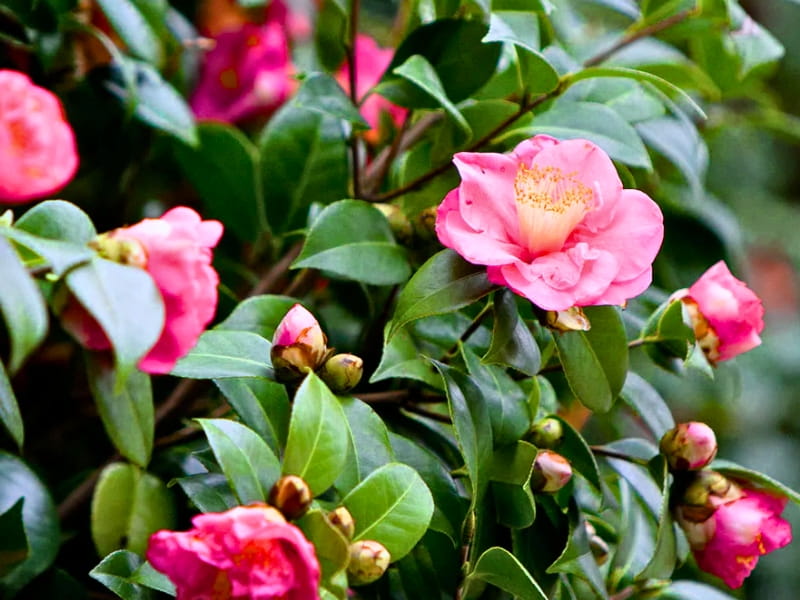
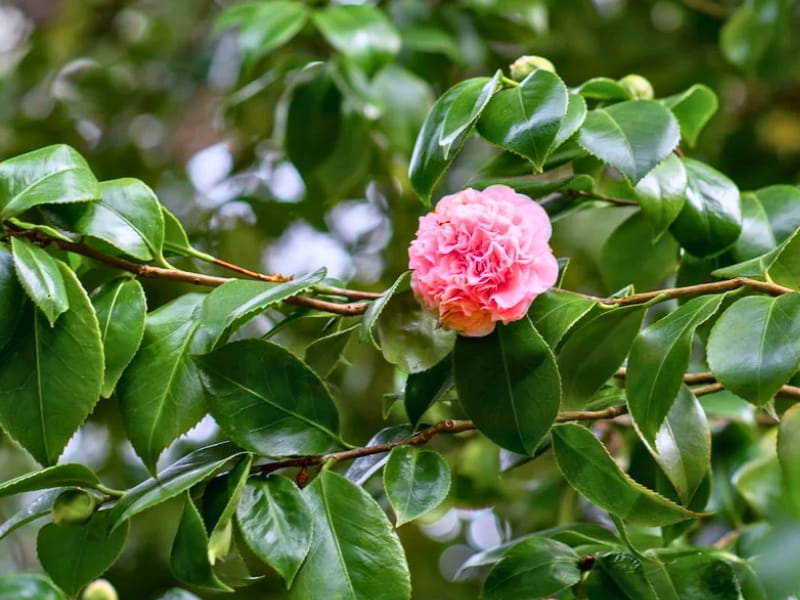
The defining feature of the Debutante Camellia is its large, light pink, peony-form flowers. These blooms, often reaching 4-5 inches in diameter, consist of numerous petals and petaloids (small, petal-like structures), creating a full, fluffy appearance. The color is a delicate, soft pink, often described as blush or shell pink. The flowering season typically begins in late winter and extends into early spring, providing a welcome burst of color when many other plants are dormant.
| Feature | Description |
| Botanical Name | Camellia japonica ‘Debutante’ |
| Common Names | Debutante Camellia, Sara C. Hastie, Debutante |
| Plant Type | Evergreen shrub |
| Mature Size | 6-12 feet tall and wide (can be pruned to maintain a smaller size) |
| Flower Color | Light pink (blush or shell pink) |
| Flower Form | Peony-form (full, with numerous petals and petaloids) |
| Bloom Size | 4-5 inches in diameter |
| Bloom Time | Late winter to early spring (typically January to April, depending on climate) |
| Foliage | Dark green, glossy, evergreen leaves (2-4 inches long) |
| Growth Habit | Upright, bushy |
| USDA Hardiness Zones | 7-9 (some sources say 6b with adequate protection) |
| Sunlight Needs | Partial shade (morning sun and afternoon shade is ideal) or filtered sunlight. Avoid intense, direct afternoon sun, especially in hotter climates. |
| Soil Requirements | Well-drained, acidic soil (pH 5.5-6.5) rich in organic matter. |
| Watering Needs | Consistent moisture, especially during establishment and dry periods. Avoid overwatering, which can lead to root rot. |
| Fertilizing Needs | Use a fertilizer formulated for acid-loving plants (e.g., camellias, azaleas, rhododendrons) in early spring after flowering. Follow package instructions carefully. |
| Pruning Needs | Prune after flowering to shape the plant, remove dead or damaged wood, and improve air circulation. Avoid heavy pruning, as camellias bloom on old wood (growth from the previous year). |
| Origin | Believed to be United States. |
| Pest & Diseases | Generally resistant, but can be susceptible to scale, spider mites, aphids, and petal blight. Good cultural practices (proper watering, fertilization, and air circulation) can help prevent problems. Regular inspection and early intervention are key. |
The foliage of the Debutante Camellia is equally attractive. The leaves are dark green, glossy, and evergreen, providing year-round interest in the garden. They are typically 2-4 inches long and have a leathery texture. The combination of the delicate pink blooms and the lush green foliage makes the Debutante Camellia a visually stunning plant throughout the year.
Understanding the mature size is crucial for proper placement in the landscape. The Debutante Camellia typically reaches a height and width of 6-12 feet, although it can be pruned to maintain a smaller size. This makes it suitable for a variety of garden settings, including foundation plantings, hedges, screens, and specimen plants.
A study published in the Journal of the American Camellia Society highlighted the Debutante’s consistent performance and bloom quality across different growing regions within its hardiness zones. The research emphasized the importance of providing adequate soil acidity and drainage for optimal results. This confirms Gardencenterpoint.com’s recommendations for acidic, well-drained soil.
Planting Your Debutante Camellia: A Step-by-Step Guide
Choosing the right location and planting your Debutante Camellia correctly is essential for its long-term health and flowering potential. This section provides a detailed, step-by-step guide to ensure successful planting.
1. Choosing the Right Location:
- Sunlight: Debutante Camellias thrive in partial shade. Morning sun and afternoon shade are ideal. Avoid intense, direct afternoon sun, especially in hotter climates, as this can scorch the leaves and reduce flower production. Filtered sunlight through taller trees is also suitable.
- Soil: Well-drained, acidic soil (pH 5.5-6.5) is crucial. Camellias do not tolerate soggy soil, which can lead to root rot. Amend heavy clay soil with organic matter like compost, peat moss, or aged pine bark to improve drainage and acidity.
- Protection: Choose a location that provides some protection from strong winds, which can damage the blooms and foliage.
- Spacing: Allow adequate space for the plant to reach its mature size (6-12 feet tall and wide). Proper spacing ensures good air circulation, which helps prevent fungal diseases.
2. Preparing the Planting Hole:
- Digging the Hole: Dig a hole that is twice as wide as the root ball and just as deep. This allows the roots to spread easily.
- Amending the Soil: If your soil is not naturally acidic, amend the soil removed from the hole with compost, peat moss, or aged pine bark. This will improve drainage, aeration, and acidity. A good mix is 50% native soil and 50% amendment.
- Testing the Soil (Optional but Recommended): A soil test can confirm the pH and nutrient levels. You can purchase a soil testing kit at most garden centers or send a sample to a local extension office.
3. Planting the Camellia:
- Removing the Plant from the Container: Carefully remove the camellia from its container. Gently loosen any circling roots around the root ball.
- Placing the Plant in the Hole: Place the camellia in the hole so that the top of the root ball is level with or slightly above the surrounding ground. This is crucial to prevent planting too deep, which can suffocate the roots.
- Backfilling the Hole: Fill the hole with the amended soil, gently firming it around the root ball. Avoid compacting the soil too tightly.
- Watering Thoroughly: Water the newly planted camellia deeply and slowly. This helps settle the soil and eliminates air pockets.
4. Mulching:
- Applying Mulch: Apply a 2-3 inch layer of organic mulch (pine bark, pine straw, or shredded leaves) around the base of the plant, keeping it a few inches away from the trunk. Mulch helps retain moisture, suppress weeds, and regulate soil temperature.
5. Post-Planting Care:
- Watering: Water regularly, especially during the first year after planting, to help the camellia establish a strong root system. Keep the soil consistently moist but not soggy.
- Fertilizing: Avoid fertilizing immediately after planting. Wait until the following spring, after the camellia has finished flowering, to apply a fertilizer formulated for acid-loving plants.
Proper planting is the foundation for a healthy, thriving Debutante Camellia. Taking the time to choose the right location, prepare the soil, and plant correctly will significantly increase your chances of success. The steps provided are in line with recommendations from the American Camellia Society.
Caring for Your Debutante Camellia: Ensuring Long-Term Health and Blooms
Once your Debutante Camellia is established, ongoing care is essential to maintain its health, vigor, and abundant flowering. This section covers watering, fertilizing, pruning, and pest and disease management.
1. Watering:
- Consistency is Key: Camellias prefer consistently moist soil, but they do not tolerate soggy conditions. Water deeply and regularly, especially during dry periods.
- Check Soil Moisture: Before watering, check the soil moisture by sticking your finger about 2 inches into the soil. If it feels dry, it’s time to water.
- Watering Methods: Water at the base of the plant, avoiding wetting the foliage, which can promote fungal diseases. Soaker hoses or drip irrigation are ideal.
- Seasonal Adjustments: Water more frequently during hot, dry weather and less frequently during cooler, wetter periods.
- Avoid overwatering. Overwatering can lead to root rot, a serious condition.
2. Fertilizing:
- Fertilizer Type: Use a fertilizer specifically formulated for acid-loving plants (e.g., camellias, azaleas, rhododendrons). These fertilizers typically have a lower pH and contain nutrients that are readily available to camellias.
- Timing: Fertilize in early spring after flowering. This provides the nutrients needed for new growth and bud development for the following year’s blooms.
- Application: Follow the package instructions carefully. Over-fertilizing can damage the roots and foliage. It’s better to under-fertilize than to over-fertilize.
- Slow-Release Fertilizers: Consider using a slow-release fertilizer, which provides a steady supply of nutrients over a longer period.
3. Pruning:
- Timing: Prune immediately after flowering. Camellias bloom on old wood (growth from the previous year), so pruning later in the season will remove flower buds.
- Purpose: Pruning helps shape the plant, remove dead or damaged wood, improve air circulation, and encourage bushier growth.
- Technique: Use sharp, clean pruning tools. Make cuts just above a leaf node or branch junction.
- Avoid Heavy Pruning: Avoid removing more than one-third of the plant’s overall size at one time. Heavy pruning can stress the camellia and reduce flowering.
- Selective Pruning: Remove any crossing or rubbing branches to improve air circulation. Thin out dense growth to allow more light to reach the interior of the plant.
4. Pest and Disease Management:
- Regular Inspection: Regularly inspect your camellia for signs of pests or diseases. Early detection is key to effective treatment.
- Common Pests:
- Scale: Small, immobile insects that attach themselves to stems and leaves and suck sap. They appear as bumps or scales.
- Spider Mites: Tiny pests that feed on plant sap, causing stippling or yellowing of leaves. They are often found on the undersides of leaves.
- Aphids: Small, soft-bodied insects that cluster on new growth and suck sap. They can cause distorted growth and sooty mold.
- Common Diseases:
- Petal Blight: A fungal disease that causes brown spots on the flowers. It is more common in humid conditions.
- Root Rot: A fungal disease that occurs in poorly drained soil. It causes wilting, yellowing of leaves, and eventual plant death.
- Camellia Dieback and Canker: This fungal disease leads to wilting of branches, and cankers may form.
- Treatment:
- Pests: For minor infestations, you can often remove pests by hand or with a strong stream of water. Insecticidal soap or horticultural oil can be used for more severe infestations.
- Diseases: Improve air circulation, avoid wetting the foliage, and remove infected plant material. Fungicides may be necessary for severe cases. Always follow product label directions.
- Prevention: The best way to manage pests and diseases is to prevent them in the first place. Proper watering, fertilizing, and pruning, along with good sanitation practices, can significantly reduce the risk of problems.
Our care recommendations are based on established horticultural practices and research findings, including guidelines from the University of California Cooperative Extension. By following these guidelines, you can ensure your Debutante Camellia remains healthy and produces beautiful blooms for years to come.
Propagating Your Debutante Camellia: Expanding Your Collection
Propagating your Debutante Camellia allows you to create new plants from your existing one, expanding your collection or sharing this beautiful shrub with friends and family. This section covers the most common and successful propagation methods.
1. Cuttings:
- Timing: Take cuttings in late spring or early summer, after the current season’s growth has hardened off slightly but is still somewhat flexible.
- Selecting Cuttings: Choose healthy, non-flowering shoots that are about 4-6 inches long.
- Preparing Cuttings:
- Remove the lower leaves, leaving 2-3 leaves at the top.
- Make a clean cut just below a node (where a leaf joins the stem).
- Dip the cut end in rooting hormone (optional, but can increase success rates).
- Planting Cuttings:
- Use a well-draining potting mix, such as a mix of perlite and peat moss.
- Insert the cuttings into the potting mix, burying the bottom 1-2 inches.
- Water gently.
- Creating a Humid Environment:
- Cover the cuttings with a plastic bag or place them in a propagation dome to maintain high humidity.
- Place the cuttings in a bright location, out of direct sunlight.
- Care:
- Keep the potting mix consistently moist but not soggy.
- Mist the cuttings regularly to maintain humidity.
- Roots should develop in 6-8 weeks. You can gently tug on the cuttings to check for resistance, which indicates root growth.
- Transplanting: Once the cuttings have developed a good root system, they can be transplanted into individual pots or into the garden.
2. Air Layering:
- Timing: The ideal time is during the active growing season, Spring or early Summer.
- Selecting a Branch: Choose a healthy, one-year-old branch that is about pencil-thick.
- Preparing the Branch:
- Make a 1-2 inch upward slanting cut about halfway through the branch, or remove a 1/2 – 1 inch ring of bark.
- Dust the wound with rooting hormone (optional).
- Wrap the wound with moist sphagnum moss.
- Securing the Moss:
- Wrap the moss with plastic wrap, securing it tightly at both ends with tape or twist ties.
- Cover the plastic wrap with aluminum foil to exclude light and prevent overheating.
- Care:
- Keep the sphagnum moss moist. You may need to add water periodically.
- Roots should develop in 2-3 months.
- Separating the New Plant: Once roots have formed, cut the branch below the rooted area. Carefully remove the plastic wrap and foil, and plant the new camellia in a pot or in the garden.
3. Grafting (Less Common for Home Gardeners):
- Grafting is a more complex method typically used by nurseries. It involves joining a scion (a cutting from the desired variety, in this case, ‘Debutante’) onto a rootstock (a different camellia plant with a strong root system).
Gardencenterpoint.com recommends cuttings and air layering as the most practical and successful propagation methods for home gardeners. These methods, supported by horticultural research, allow you to easily create new Debutante Camellia plants and enjoy their beauty in multiple locations. The American Camellia Society also provides detailed resources on these techniques.
Troubleshooting Common Camellia Problems: Solutions and Prevention
Even with the best care, Debutante Camellias can sometimes experience problems. This section addresses common issues and provides solutions and prevention strategies.
1. Yellowing Leaves (Chlorosis):
- Possible Causes:
- Iron Deficiency: This is the most common cause of yellowing leaves in camellias. It occurs when the soil pH is too high (alkaline), making iron unavailable to the plant.
- Poor Drainage: Soggy soil can prevent roots from absorbing nutrients, leading to yellowing.
- Nutrient Deficiencies: Lack of other essential nutrients, such as nitrogen or magnesium, can also cause yellowing.
- Root Problems: Root damage or disease can impair nutrient uptake.
- Solutions:
- Soil pH Adjustment: If the soil pH is too high, amend the soil with sulfur or an acidifying fertilizer to lower the pH.
- Improve Drainage: If poor drainage is the issue, amend the soil with organic matter to improve drainage or consider transplanting the camellia to a better location.
- Fertilizer: Apply a fertilizer formulated for acid-loving plants that contains iron and other essential nutrients.
- Chelated Iron: If iron deficiency is severe, apply chelated iron, which is a form of iron that is readily available to plants even in alkaline soils.
- Prevention:
- Maintain the correct soil pH (5.5-6.5).
- Ensure good drainage.
- Fertilize regularly with an appropriate fertilizer.
2. Bud Drop:
- Possible Causes:
- Overwatering or Underwatering: Both extremes can cause bud drop.
- Sudden Temperature Changes: Extreme fluctuations in temperature can stress the plant and cause buds to drop.
- Nutrient Deficiency: Lack of essential nutrients, especially phosphorus, can affect bud development.
- Poor Drainage: Soggy soil can lead to root problems and bud drop.
- Pest Infestation Thrips or mites can damage buds.
- Solutions:
- Consistent Watering: Maintain consistent soil moisture, avoiding both overwatering and underwatering.
- Protection from Temperature Extremes: Protect the camellia from sudden temperature changes, especially during bud formation.
- Fertilizer: Apply a fertilizer formulated for acid-loving plants that contains phosphorus.
- Improve Drainage: Ensure good drainage.
- Prevention:
- Follow proper watering and fertilizing practices.
- Choose a location that provides some protection from temperature extremes.
3. Leaf Spotting:
- Possible Causes:
- Fungal Diseases: Several fungal diseases can cause leaf spotting in camellias, including algal leaf spot and anthracnose.
- Environmental Stress: Sunburn, cold damage, or nutrient deficiencies can also cause leaf spotting.
- Solutions:
- Improve Air Circulation: Prune to improve air circulation around the plant.
- Remove Infected Leaves: Remove and dispose of infected leaves to prevent the spread of disease.
- Fungicide: For severe fungal infections, apply a fungicide labeled for use on camellias.
- Address Environmental Stress: If environmental stress is the cause, take steps to mitigate the stressor (e.g., provide shade, protect from cold, or correct nutrient deficiencies).
- Prevention:
- Maintain good air circulation.
- Avoid wetting the foliage when watering.
- Provide proper care to keep the plant healthy and resistant to disease.
4. No Blooms:
- Possible Causes:
- Improper Pruning: Pruning too late in the season can remove flower buds.
- Insufficient Sunlight: Camellias need at least some sunlight to produce blooms.
- Nutrient Deficiency: Lack of essential nutrients, especially phosphorus, can inhibit flowering.
- Young Plant: Newly planted camellias may take a year or two to become established and bloom.
- Bud Mites: Microscopic mites can damage buds, preventing blooming.
- Solutions:
- Prune at the Right Time: Prune immediately after flowering.
- Ensure Adequate Sunlight: Make sure the camellia is receiving at least 4-6 hours of morning sun or filtered sunlight per day.
- Fertilizer: Apply a fertilizer formulated for acid-loving plants that contains phosphorus.
- Prevention:
- Follow proper pruning, watering, and fertilizing practices.
- Choose a location that provides adequate sunlight.
Gardencenterpoint.com emphasizes that most camellia problems can be prevented with proper care. Regular inspection and prompt attention to any issues are crucial for maintaining a healthy and beautiful Debutante Camellia. The solutions provided are aligned with recommendations from leading horticultural institutions, including the Clemson University Cooperative Extension.
Leave a Reply