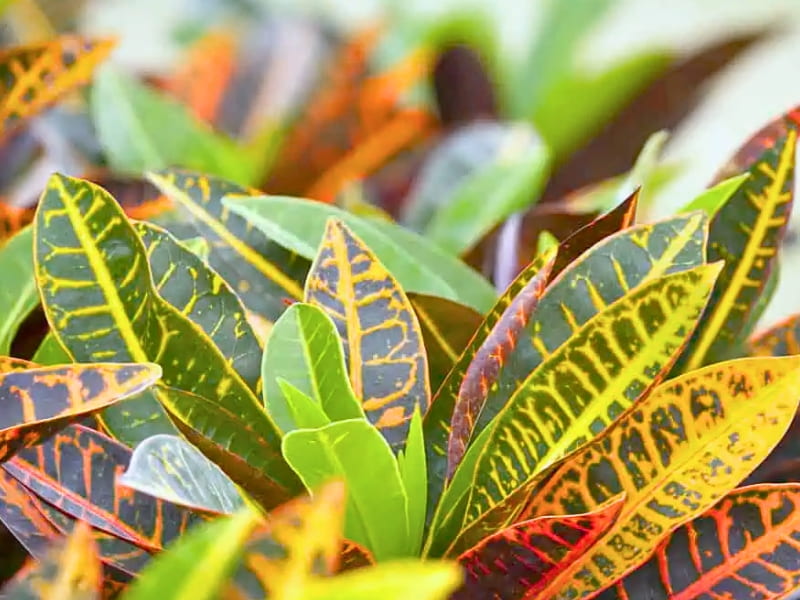
Garden Croton, also commonly known as Croton, Variegated Laurel, and Joseph’s Coat, botanically named Codiaeum variegatum, is a striking tropical plant renowned for its vibrant, multi-colored foliage. These plants offer a stunning array of leaf shapes and patterns, making them a popular choice for adding a splash of color to homes and gardens.
At Gardencenterpoint.com, we understand the desire to cultivate these beautiful specimens. This guide provides the comprehensive information you need to successfully grow and care for your Garden Croton, including detailed how to care instructions, where to buy healthy plants, and exploration of different varieties. We’ll help you make your Croton, a true object of botanical desire.
1. Understanding Garden Croton: A Deep Dive
Garden Crotons are native to Indonesia, Malaysia, Australia, and the Western Pacific Ocean islands. They belong to the Euphorbiaceae family, which also includes plants like poinsettias and spurges. The defining feature of Garden Crotons is their incredibly diverse foliage. Leaves can be broad, narrow, twisted, lobed, or even oak-leaf shaped. The color palette is equally impressive, ranging from vibrant yellows, oranges, and reds to deep greens, purples, and almost black. This variegation is caused by variations in the levels of chlorophyll and other pigments within the leaf cells.
| Common names | Garden Croton, Croton, Variegated Laurel, Joseph’s Coat |
| Botanical name | Codiaeum variegatum |
| Family | Euphorbiaceae |
| Genus | Codiaeum |
| Species | variegatum |
| Origin | Indonesia, Malaysia, Australia, Western Pacific Islands |
| Native | Southeast Asia, Pacific Islands |
| Life cycle | Perennial |
| Plant type | Broadleaf evergreen shrub (typically grown as a houseplant) |
| Hardiness zone | 9b-11 (outdoors), generally grown as a houseplant in other zones. |
| Sunlight | Bright, indirect light; tolerates some direct morning sun. |
| Maintenance | Moderate |
| Water | Moderate; allow the top inch of soil to dry slightly between waterings. |
| Drainage | Well-drained soil is essential. |
| Spacing | Varies depending on cultivar and pot size; typically 1-3 feet. |
| Flowering period | Rarely flowers indoors; flowers are insignificant. |
| Height | Varies widely by cultivar; typically 1-6 feet indoors, up to 10 feet or more outdoors in suitable climates. |
| Growth rate | Moderate to fast, depending on conditions and cultivar. |
| Leaf color | Highly variable; combinations of green, yellow, orange, red, pink, purple, and almost black. |
| Leaf shape | Variable; can be oval, lanceolate, lobed, twisted, or curled. |
| Stem color | Green, brown, or reddish, depending on cultivar and age. |
| Flower benefit | Insignificant flowering; grown for foliage. |
| Garden style | Tropical, container gardening, houseplant. |
| Uses | Houseplant, accent plant, specimen plant, outdoor landscape plant (in suitable climates). |
| Soil pH | Slightly acidic to neutral (6.1-7.0) |
| Toxicity | Toxic to humans and pets if ingested; sap can cause skin irritation. |
| Air Purification | Contributes, see previous section. |
The patterns themselves are also highly variable. Some Crotons display bold splashes of color, while others have intricate veining, spotting, or speckling. This incredible diversity is due to extensive hybridization and selective breeding over many years. There are hundreds of named cultivars, each with its unique combination of color, shape, and pattern.
A crucial aspect of understanding Garden Crotons is recognizing their tropical origins. This dictates their care requirements, particularly their need for warmth, humidity, and bright, indirect light. They are not frost-tolerant and will suffer damage if exposed to temperatures below 50°F (10°C). In most climates, they are grown as houseplants, but they can thrive outdoors in USDA Hardiness Zones 9b-11.
It’s important to note that Garden Croton sap can be a skin irritant for some individuals. It’s always a good idea to wear gloves when handling the plant, especially during pruning or propagation. Also, all parts of the Garden Croton are considered toxic if ingested, so it’s crucial to keep them out of reach of children and pets. A study published in the Journal of Toxicology: Clinical Toxicology documented cases of gastrointestinal upset and other symptoms following Croton ingestion.
2. Essential Garden Croton Care: A Step-by-Step Guide
Providing the right care is paramount to keeping your Garden Croton healthy and vibrant. Here’s a detailed breakdown of the key elements:
2.1 Light Requirements: The Key to Vibrant Color
Garden Crotons need bright, indirect light to maintain their vibrant leaf coloration. Insufficient light will cause the colors to fade, and the leaves may become predominantly green. Direct, intense sunlight, on the other hand, can scorch the leaves, leading to brown patches and leaf drop.
- Ideal Location: An east-facing window provides ideal light conditions, offering bright morning sun and protection from the harsh afternoon rays. A south-facing window can also work, but you’ll need to filter the light with a sheer curtain or move the plant slightly back from the window. West-facing windows can be too intense in the afternoon.
- Artificial Light: If you don’t have sufficient natural light, you can supplement with grow lights. Full-spectrum LED grow lights are an excellent option, providing the necessary wavelengths for photosynthesis and color development. Aim for 12-14 hours of light per day under grow lights.
- Assessing Light Levels: A simple way to gauge light levels is the shadow test. Hold your hand about 12 inches above the plant. If the shadow is faint and blurry, the light is likely too low. A sharp, well-defined shadow indicates bright, indirect light. A very dark, intense shadow suggests the light may be too direct.
- Seasonal Adjustments: You may need to adjust your Croton’s position throughout the year as the angle and intensity of the sun change.

2.2 Watering: Finding the Right Balance
Proper watering is crucial for Garden Croton health. They prefer consistently moist soil, but they are susceptible to root rot if overwatered. The key is to find the right balance, allowing the top inch of soil to dry out slightly between waterings.
- Watering Frequency: This will depend on several factors, including the size of the pot, the type of soil, the temperature, and the humidity. As a general guideline, water thoroughly when the top inch of soil feels dry to the touch. This may be once a week in warmer months and less frequently in cooler months.
- Watering Technique: Water deeply, allowing the water to drain freely from the drainage holes at the bottom of the pot. This ensures that the entire root system is hydrated. Discard any excess water that collects in the saucer to prevent the roots from sitting in water.
- Signs of Overwatering: Yellowing leaves, leaf drop, and a mushy stem are all signs of overwatering. If you suspect overwatering, reduce watering frequency and allow the soil to dry out more between waterings. You may also need to repot the plant in fresh, well-draining soil.
- Signs of Underwatering: Wilting, drooping leaves, and dry, crispy leaf edges indicate underwatering. Increase watering frequency and ensure the soil is thoroughly moistened during each watering.
- Water Quality: Garden Crotons are sensitive to the salts and minerals found in hard water. If you have hard water, consider using filtered or distilled water, or let tap water sit out for 24 hours before using it to allow some of the chlorine to dissipate.
2.3 Soil and Potting: Providing a Stable Foundation
Garden Crotons thrive in a well-draining potting mix that retains some moisture but doesn’t become waterlogged.
- Ideal Soil Mix: A good potting mix for Crotons typically consists of peat moss, perlite, and vermiculite. Peat moss helps retain moisture, while perlite and vermiculite improve drainage and aeration. You can also add a small amount of compost to provide nutrients. A pre-mixed African violet potting mix is often a suitable option.
- Avoid Heavy Soils: Avoid using garden soil or potting mixes that are too heavy and compact. These soils can retain too much water, leading to root rot.
- Pot Size: Choose a pot that is slightly larger than the plant’s root ball. A pot that is too large can hold too much moisture, while a pot that is too small can restrict root growth.
- Drainage Holes: Ensure the pot has adequate drainage holes to allow excess water to escape.
- Repotting: Garden Crotons generally need to be repotted every 1-2 years, or when they become root-bound. Signs of a root-bound plant include roots circling the bottom of the pot, slow growth, and frequent wilting. When repotting, choose a pot that is one size larger and use fresh potting mix. Gently loosen the roots before replanting.
2.4 Temperature and Humidity: Mimicking the Tropics
Garden Crotons prefer warm temperatures and high humidity, reflecting their tropical origins.
- Temperature Range: The ideal temperature range for Garden Crotons is 65-80°F (18-27°C). They can tolerate slightly higher temperatures, but they are sensitive to cold drafts and temperatures below 50°F (10°C).
- Humidity Levels: Garden Crotons thrive in humidity levels of 40-80%. Low humidity can cause leaf drop, browning edges, and increased susceptibility to pests.
- Increasing Humidity: There are several ways to increase humidity around your Croton:
- Pebble Tray: Place the pot on a tray filled with pebbles and water. The water will evaporate, increasing the humidity around the plant. Make sure the pot is not sitting directly in the water.
- Humidifier: Use a humidifier to increase the overall humidity in the room.
- Grouping Plants: Group plants together to create a microclimate of higher humidity.
- Misting: Mist the leaves regularly with water. However, misting alone may not be sufficient in very dry environments.
- Avoid Drafts: Keep your Croton away from cold drafts, such as those from air conditioners, heating vents, and open windows.
2.5 Fertilizing: Providing Essential Nutrients
Garden Crotons are moderate feeders and benefit from regular fertilization during the growing season (spring and summer).
- Fertilizer Type: Use a balanced, water-soluble fertilizer formulated for houseplants. A fertilizer with an NPK ratio of 3-1-2 is a good option, providing a higher proportion of nitrogen to support foliage growth.
- Fertilizing Frequency: Fertilize every 2-4 weeks during the growing season. Reduce or stop fertilizing during the fall and winter when growth slows down.
- Application Rate: Follow the instructions on the fertilizer package carefully. Over-fertilizing can damage the roots and leaves. It’s generally better to under-fertilize than to over-fertilize.
- Signs of Nutrient Deficiency: Yellowing leaves, slow growth, and lack of vibrant color can indicate a nutrient deficiency.
- Flushing the Soil: Periodically flush the soil with plain water to remove any built-up salts from fertilizer.
2.6 Pruning and Shaping: Maintaining Size and Form
Pruning is not essential for Garden Croton health, but it can be used to maintain the plant’s size and shape, encourage bushier growth, and remove any dead or damaged leaves.
- Timing: The best time to prune is in the spring or early summer, when the plant is actively growing.
- Tools: Use sharp, clean pruning shears or scissors. Sterilize the tools with rubbing alcohol before and after use to prevent the spread of disease.
- Technique: Make cuts just above a leaf node (the point where a leaf joins the stem). This will encourage new growth to emerge from that node.
- Removing Dead or Damaged Leaves: Remove any yellow, brown, or damaged leaves by cutting them off at the base of the petiole (the leaf stalk).
- Pinching Back: Pinch back the growing tips of the stems to encourage bushier growth. This involves simply removing the top few leaves of a stem.
- Safety Precautions: Wear gloves when pruning, as the sap can irritate the skin.
2.7 Propagation: Creating New Plants
Garden Crotons can be easily propagated from stem cuttings. This is a great way to create new plants or to rejuvenate an older, leggy plant.
- Timing: The best time to take stem cuttings is in the spring or early summer.
- Materials:
- Sharp, clean knife or pruning shears
- Rooting hormone (optional, but recommended)
- Small pot filled with well-draining potting mix
- Plastic bag or humidity dome
- Steps:
- Take a 4-6 inch stem cutting from a healthy stem. The cutting should have at least 2-3 leaves.
- Remove the lower leaves from the cutting, leaving only the top 2-3 leaves.
- Dip the cut end of the cutting in rooting hormone (optional).
- Insert the cutting into the potting mix, burying the bottom node(s) where the leaves were removed.
- Water the cutting thoroughly.
- Cover the pot with a plastic bag or humidity dome to create a humid environment.
- Place the pot in a warm, brightly lit location, out of direct sunlight.
- Keep the soil consistently moist, but not waterlogged.
- Roots should develop within 4-8 weeks. You can gently tug on the cutting to check for resistance, which indicates root growth.
- Once the cutting has established roots, remove the plastic bag or humidity dome and gradually acclimate the plant to normal indoor conditions.
3. Common Garden Croton Problems and Solutions
Even with the best care, Garden Crotons can sometimes experience problems. Here are some of the most common issues and how to address them:
3.1 Leaf Drop: Identifying the Cause
Leaf drop is a common problem with Garden Crotons, and it can be caused by a variety of factors:
- Sudden Changes in Environment: Garden Crotons are sensitive to sudden changes in temperature, light, or humidity. Moving the plant to a new location or exposing it to drafts can trigger leaf drop. Try to keep the environment as stable as possible.
- Underwatering: Wilting and leaf drop can be a sign of underwatering. Check the soil moisture and water thoroughly if needed.
- Overwatering: Yellowing leaves and leaf drop can also be a sign of overwatering. Allow the soil to dry out more between waterings.
- Low Humidity: Dry air can cause leaf drop. Increase humidity levels using a pebble tray, humidifier, or by grouping plants together.
- Pests: Pests like spider mites, mealybugs, and scale can infest Garden Crotons and cause leaf drop. Inspect the plant regularly for signs of pests and treat accordingly.
- Cold Temperatures: Exposure to cold temperatures below 50°F can cause damage and leaf drop.
3.2 Pest Infestations: Prevention and Treatment
Garden Crotons can be susceptible to several common houseplant pests:
- Spider Mites: These tiny pests are difficult to see with the naked eye, but they create fine webbing on the leaves and stems. They thrive in dry conditions.
- Mealybugs: These white, cottony insects cluster on the stems and undersides of leaves.
- Scale: These small, brown insects attach themselves to the stems and leaves and suck sap from the plant.
- Aphids: Small, soft-bodied insect found under leaves, or on stems.
- Prevention:
- Inspect your plant regularly for signs of pests.
- Maintain high humidity levels to deter spider mites.
- Isolate new plants for a few weeks before introducing them to your collection.
- Avoid over-fertilizing, as this can attract pests.
- Treatment:
- Insecticidal Soap: Insecticidal soap is a safe and effective treatment for many common houseplant pests.
- Neem Oil: Neem oil is another natural insecticide that can be effective against pests.
- Rubbing Alcohol: For small infestations, you can dab the pests with a cotton swab dipped in rubbing alcohol.
- Manual Removal: For larger pests like scale, you can manually remove them with your fingernail or a cotton swab.
- Systemic Insecticide: In severe cases, you may need to use a systemic insecticide, which is absorbed by the plant and kills pests that feed on it. Follow the instructions on the product label carefully.
3.3 Diseases: Recognizing and Managing
Garden Crotons are generally resistant to diseases, but they can be susceptible to a few fungal problems, especially in humid conditions:
- Root Rot: This is the most common disease of Garden Crotons, and it’s usually caused by overwatering. Symptoms include yellowing leaves, leaf drop, and a mushy stem.
- Leaf Spot: Fungal leaf spot diseases can cause brown or black spots on the leaves.
- Powdery Mildew: Powdery white coating found on leaves.
- Prevention:
- Avoid overwatering.
- Provide good air circulation.
- Water at the base of the plant, avoiding wetting the leaves.
- Remove any dead or diseased leaves promptly.
- Treatment:
- Root Rot: If root rot is severe, the plant may not be salvageable. If it’s caught early, you can try repotting the plant in fresh, well-draining soil and reducing watering frequency.
- Leaf Spot: Remove any affected leaves and improve air circulation. You can also apply a fungicide labeled for use on houseplants.
- Powdery Mildew: Increase air circulation, and apply a fungicide.
4. Garden Croton Varieties: A World of Color and Form
There are hundreds of Garden Croton cultivars, each with its unique combination of leaf shape, color, and pattern. Here are a few popular examples:
- ‘Petra’: This is one of the most popular Croton varieties, featuring large, oval leaves with bold veins of red, orange, and yellow.
- ‘Gold Dust’: This variety has smaller, elliptical leaves that are speckled with golden yellow spots.
- ‘Mammy’: This Croton has twisted, curled leaves with a mix of red, orange, yellow, and green.
- ‘Eleanor Roosevelt’: Long Narrow leaves with a variety of coloration.
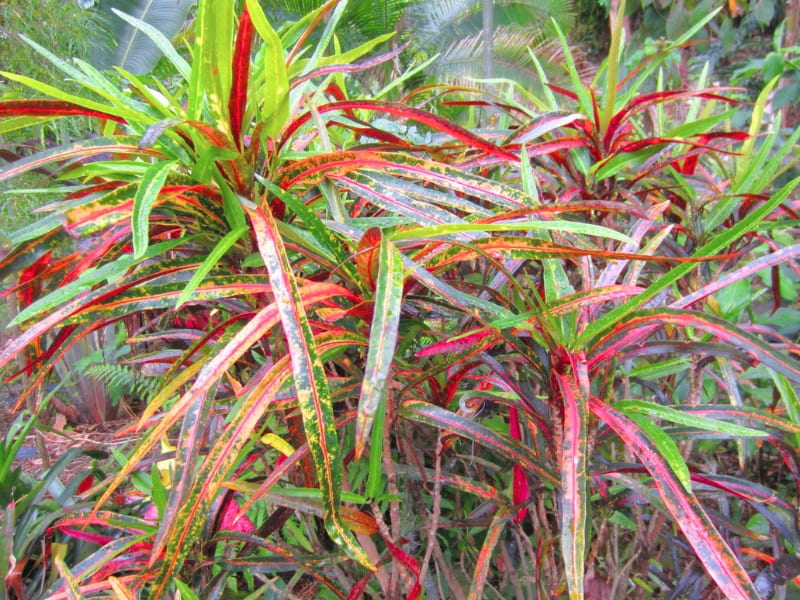
- ‘Zanzibar’: This cultivar has very narrow, almost grass-like leaves in shades of red, orange, and yellow.
- ‘Oakleaf’: This variety has leaves that resemble oak leaves, with a mix of green, yellow, and red.
Leave a Reply